Anyway! This is a good, pretty kind of pressing. All those lovely fabrics that you've chosen are waiting to be pressed and cut, ready to be made into your work of art. Wonderful!

I went out and bought a relatively plain & simple iron with a steam function from Sainsburys for £12 to use for my quilting. I also sought out a table-top ironing board to sit next to me - this is mainly because if that ironing boards isn't near you, the chances are you won't iron your work, and that's disastrous. Press, press, press. And if in doubt, yep you guessed it!
Once all your gorgeous fabrics have been pressed, and you've spent longer than is acceptable admiring both the fabrics and your brilliance, it's time to CUT!
The Cutting
VIEW A SHORT VIDEO HERE!
VIEW A SHORT VIDEO HERE!
The best way is to cut with a large quilting ruler and a rotary cutter. It's quick, clean and accurate (as long as you do it properly!). You can use a ruler, marker & fabric scissors but be aware that this won't be quite as accurate so you might have to accept that your seams/points aren't as matchup as they could be.
I use a large 24"x12" ruler, an A2 cutting may and an Olfa & Dafa rotary cutter.
The most important step in cutting your fabric - making sure that you cut in the direction of the grain. You might have heard of the warp and weft of fabric, sonic have included the picture below for reference. Save it somewhere you can refer to it easily! If you don't cut in the direction of the grain you risk cutting across it, leaving it more susceptible to stretching out of shape. Not good.
The best way to cut any fabric that I have found it to fold it with the selvedge edges together. If you have a fat quarter, you will have only one selvedge, so match that up to the opposite side (see video).
Once you have done that, you might need to shift the fabric slightly in one direction or the other as you want to make sure the fold at the bottom sits straight without any curve or twist.

Lay your fabric down on your cutting mat (or a stable surface) and put your ruler on top, towards the right side (if right handed). Line up one of the horizontal lines on your ruler to the fold of the fabric. This will ensure a clean cut. Once lined up, hold the ruler down firmly and cut AWAY from your body with the rotary cutter. Keep the ruler in place while you move the discarded fabric away, just in case you need to make any further cuts to free it away from the main piece.

After this, you will need to flip the fabric, without letting the fabric shift. Hold the new cut firmly and move it to the left side of you. You can then place your ruler on the clean cut in order to make any further cuts that you need. ALWAYS line up one of the horizontal lines on your ruler with the fold when cutting, or another edge that you have already cut & therefore KNOW to be accurate.

Below is an image of how to cut pieces from a fat quarter that I refer to quite a lot!

I would always recommend cutting all your fabric first, before you start to sew. Then you have everything you need when you do start to sew.
I always make piles of fabric, either by size or by block, so that it's much easier to grab what you need as you go along!
Choosing a Pattern
There are a million and one different places to head to for quilt patterns - Pinterest (see my boards here), blogs, books, magazines - and it's great to keep looking & keeping all your ideas in one place.
As much as I love technology, I tend to print out things I like & keep them all together in a folder so that I can reference easily when I'm sewing.
Don't just look for patterns that appear SIMPLE, as even quilts that look difficult may not be. Sometimes its down to the placement of blocks rather than the actual cutting and piecing.
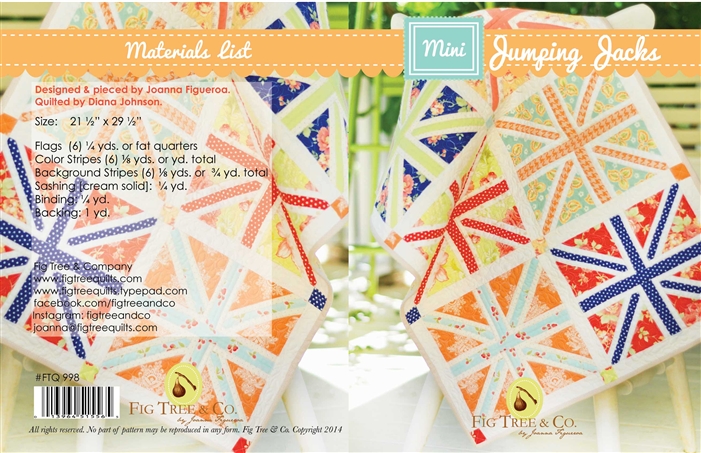
Image from Fig Tree & Co
Most patterns will tell you not only the fabric requirements, but also if you can use any precuts to aid in your pattern. American patterns tend to be written I yards as opposed to metres and centimetres that we now use in Europe. You don't have to rigidly stick to the number of difference fabrics that a pattern specifies - be creative and go with what works for you. As long as the totals are the same there's no issue!
Most patterns will tell you not only the fabric requirements, but also if you can use any precuts to aid in your pattern. American patterns tend to be written I yards as opposed to metres and centimetres that we now use in Europe. You don't have to rigidly stick to the number of difference fabrics that a pattern specifies - be creative and go with what works for you. As long as the totals are the same there's no issue!
I love scouring blogs, Pinterest and Instagram for inspiration and patterns & keep them all in a folder on my Dropbox account so that they're always result accessible.
I have quite a few patterns from Thimble Blossoms and Fig Tree & Co which I absolutely love, so check them out.
I have quite a few patterns from Thimble Blossoms and Fig Tree & Co which I absolutely love, so check them out.
Our next post will be on sewing your pieces accurately & the most common shapes you might comes across in your quilting adventures..!
No comments:
Post a Comment