Thursday 11 December 2014

December Quilting Bee: Churn Dash


This month is the turn of the gorgeous Churn Dash block.  Definitely one of my favourites!  It's so quick and easy to put together once you have done it once, that you can quickly make an entire quilt top of CDs... ;)


The Churn Dash block is most effective in just two fabrics, one for the feature and another for the "background".  This doesn't mean you have to use one light and one dark fabric, just make them different enough so that they compliment well.

Right, here are your cutting instructions....

Fabric A:
Four x 2.5" by 4.5" rectangles
Two 5" squares

Fabric B:
Four x 2.5" by 4.5" rectangles
Two 5" squares
One 4.5" square (this is the centre block)

Nice and easy to cut!  This month, we are making the two-triangles-made-into-squares blocks differently, using a method called Half Square Triangles.  It's much quicker and when doing it this way, you make it more accurate, as you have to cut down your squares to size.

VIDEO TUTORIAL HERE!

If you prefer written instructions, here goes!

1.  Cut out all of your fabric as above and lay out on large surface, by firstly placing the 4.5" centre black down.  Then surround this with your Fabric A rectangles and finally your Baric B rectangles above those.  You will end up with a cross shape.

2.  To make the Half Square Triangles, it's best to watch the video, but here is a step by step....

HALF SQUARE TRIANGLES (HST):
Place one square of each of Fabric A and Fabric B right sides together.  Pin together.
Draw a line from one corner, diagonally, to the opposite corner. 
If you have a quarter inch foot on your machine, all you need to do is use this line to sew a quarter inch EACH side.  If you don't have a foot, then draw another two lines, each a quarter inch from the first line.  Then use these two outer lines to sew along.
Cut along the first line drawn (corner to corner)
Open out your pieces.  You will now have two squares made up of your two triangles of fabric A & B.
Press your seams towards the darkest fabric.
Trim down your squares to 4.5", taking care to place the 45 degree angle line on your ruler along the seam line, to ensure that your square is cut straight (please watch the video if this doesn't make any sense!)

3.  Lay out all of your HSTs in each corner.

4.  Sew each rectangle together, along the longest side.  Press your seams to one side, or open.

5.  Sew together the top row (HST, rectangles, HST), then middle, then bottom.

6.  Press your seams to the LEFT in your top and bottom rows, and to the RIGHT in the middle row.

7.  Sew together the top and middle row, taking care to nest your seams.

8.  Sew on the bottom row, again, nesting your seams.

9.  Press your seams open or to one side!

EXPERIMENTING WITH HSTs
If you want to have a little experiment with HST (you can make so many lovely designs with just HSTs!)  then firstly decide on the size of FINISHED square that you would like to use.
Take you two chosen fabrics and cut them 1" LARGER than your finished square size (i.e. if you want 5" finished squares, but your fabric to 6")
Make up your HSTs as above, trimming down to your finished size.

Make up 4 HSTs (using just 4 pieces of fabric) and see how many different layouts you can do.  Then add in another 4, play, and so on.  Honestly, they're addictive!!!

Saturday 8 November 2014

November Quilting Bee!

So this month, we're making a Sawtooth Star... Perfect with Christmas coming up! Adapt it to make cushions or even little Xmas tree decorations and gift pouches!

VIEW VIDEO TUTORIAL HERE!


Here's what you need.....

2 or 3 different fabrics to cut the following:

Fabric A - 
4x 3.5" squares
2x 3&7/8 squares, cut once on the diagonal to give 4 triangles

Fabric B - 
4x 3&7/8 squares, cut once on the diagonal to give 8 triangles

Fabric C (or A again if you choose just 2 fabrics) - 
1x 6.5" square

Once you have your fabrics cut, lay them out as they will be placed in your finished block (see below)

The Fabric A squares make up the corners, and half of the squares around the edge (the beige fabric in the image below)

Fabric B makes up the outer squares with Fabric A (red & Aqua in the image below)

Fabric C is the centre square.

I started by sewing together the triangles to make up the outer squares as below. You are sewing along the LONGEST edge of the triangle. It might be best to press your seams open...


Once you have done this, snip any "ears" off your squares that you made up in the last step & then separate out into rows, as below


Sew each row, top first, then middle (outer pieces first, then attach both to the centre square, see below) and finally the bottom row.


Press your seams to the LEFT in the top & bottom rows and RIGHT for the Middle so that you can best your seams nicely! 


And that's it! Not too bad huh?! 


Friday 10 October 2014

Quilting Bee: October!

Hey guys!

I can't believe that we're on month two already!

Natasha is the Queen Bee this month, and has chosen the most gorgeous Autumn-y pallette...

This month, we're doing a variation on the 9-patch block and here's what you need:

Fabric 1: 4 x 3.5" squares and 1 x 6.5" square
Fabric 2: 4 x 3.5x6.5" rectangles

I would recommend using just two fabrics for this design as it makes it a little more striking!

Here is the link video tutorial for this month....any questions just SHOUT!

https://www.youtube.com/watch?v=u-PZ0dwRAa4&feature=youtu.be


Thursday 28 August 2014

How To : Patchwork Cushion

Here's the first of my monthly "how do I make....?" patchwork & quilting posts.  Each month I will do a tutorial on how to make a lovely patchwork goody, perfect for gifts or even better, to keep!

The first tutorial is a lovely, quick & simple patchwork cushion cover. It has an envelope back, so no scary zips to wrestle with!!

First of all, here is what you will need:

16x4.5"squares of fabrics in as many prints as you like (you can get 16x4.5" squares from just 1 fat quarter!)

2x 16.5"x11" rectangles of the same fabric for the envelope back


Firstly, cut your fabrics to the above dimensions, making sure to press well before you cut.

Play around with the layout of your squares & take pics of the different layouts so you can easily compare before you sew - they look massively different so it's good to have a reference to look back on! 


See?

Right once you've decided on your layout, we will see the squares together in rows. Starting from the top, using a quarter-inch seam throughout.


You will end up with the four rows as shown above.

Now you will need to press each row. You want the seams to go in the opposite direction to the row above. I always press the top row to the left, the next row down to the right & so on


Looks so much better pressed!

Next, you want to join the top two rows together.  You will need to "nest" your seams.  Basically, this means butting up your seams so that you have no gap or overlap in the seams where the rows meet. Doing this will make sure that each intersection of your squares is clean without a gap:


You'll be able to feel it when you've nested the seam properly as it will feel smooth. If there's an overlap, you'll feel a bump & if there's a gap you'll feel an indent as you run your fingertips over the seam.

Once they're nested nicely, pop a pin thrugh each side of the nested seam to hold it in place until it is sewn together:


Repeat for each intersection of seams. You might find that you have a little extra fabric between some squares & not enough between others. Don't panic! Nest your seams regardless. You'll find that as you sew, as the machine pulls the fabric trough these "problem" squares right themselves! 

I always pin slightly diagonally as shown, as this goes through both sides of the seam and also makes the pins easier to remove as they near the machine foot.


Now, sew the rows together with a quarter-inch seam.

Open out & press seams UP.

Repeat with the bottom two rows & this is what you will have:


Now, sew the two rows of two in exactly the same way. Press the seam UP again


That's the front of your cover done! Try not to spill water on yours...!

Now we need to prepare the backing.

Along the LONGER edge of each of the backing pieces, turn the edge up by about a half inch & press. Then turn by another half inch and press again. 


You'll now sew along this fold, close to the upper edge, to give a nice finished edge to the envelope back.


Repeat with the other backing piece.

Now lay these on your cover front, right sides together, lining up along the top & sides. Place the top piece on first (folded edge in the middle):


and then the bottom piece in the same way:


Now pop some pins to secure in place, especially at the corners & over the folds on the backing pieces


Now, sew around all the edges with a quarter-inch seam. Back stitch (you should have a button or lever to do this on your machine which you may need to hold while you complete the back stitch) over the opening folds, as these will get the most strain when you take the cushion pad out & put it back in.

At the corners, see to about a quarter-inch from the edge & turn.


Once you have sewn around the cover, you might want to "finish" your edges by sewing a zig-zag stitch around. This looks nice and also stops fraying & strengthens your seams up a bit too!


Now turn inside out & you'll see your finished cover!

Give it a good old press, fill with a 16" cushion pad and LOVE it forever! 


Preparing & Pattern Picking...

The main prep that you need to do, sadly, is pressing. The single most important step is pressing. The worst thing to hear when all you dread all week is ironing all the washing is pressing....

Anyway! This is a good, pretty kind of pressing. All those lovely fabrics that you've chosen are waiting to be pressed and cut, ready to be made into your work of art. Wonderful!


I went out and bought a relatively plain & simple iron with a steam function from Sainsburys for £12 to use for my quilting. I also sought out a table-top ironing board to sit next to me - this is mainly because if that ironing boards isn't near you, the chances are you won't iron your work, and that's disastrous. Press, press, press. And if in doubt, yep you guessed it! 

Once all your gorgeous fabrics have been pressed, and you've spent longer than is acceptable admiring both the fabrics and your brilliance, it's time to CUT!

The Cutting

VIEW A SHORT VIDEO HERE!
The best way is to cut with a large quilting ruler and a rotary cutter. It's quick, clean and accurate (as long as you do it properly!). You can use a ruler, marker & fabric scissors but be aware that this won't be quite as accurate so you might have to accept that your seams/points aren't as matchup as they could be.

I use a large 24"x12" ruler, an A2 cutting may and an Olfa & Dafa rotary cutter. 

The most important step in cutting your fabric - making sure that you cut in the direction of the grain. You might have heard of the warp and weft of fabric, sonic have included the picture below for reference. Save it somewhere you can refer to it easily! If you don't cut in the direction of the grain you risk cutting across it, leaving it more susceptible to stretching out of shape. Not good.

The best way to cut any fabric that I have found it to fold it with the selvedge edges together. If you have a fat quarter, you will have only one selvedge, so match that up to the opposite side (see video).

Once you have done that, you might need to shift the fabric slightly in one direction or the other as you want to make sure the fold at the bottom sits straight without any curve or twist.


Lay your fabric down on your cutting mat (or a stable surface) and put your ruler on top, towards the right side (if right handed). Line up one of the horizontal lines on your ruler to the fold of the fabric. This will ensure a clean cut. Once lined up, hold the ruler down firmly and cut AWAY from your body with the rotary cutter. Keep the ruler in place while you move the discarded fabric away, just in case you need to make any further cuts to free it away from the main piece.


After this, you will need to flip the fabric, without letting the fabric shift. Hold the new cut firmly and move it to the left side of you. You can then place your ruler on the clean cut in order to make any further cuts that you need. ALWAYS line up one of the horizontal lines on your ruler with the fold when cutting, or another edge that you have already cut & therefore KNOW to be accurate.


Below is an image of how to cut pieces from a fat quarter that I refer to quite a lot!


I would always recommend cutting all your fabric first, before you start to sew. Then you have everything you need when you do start to sew. 

I always make piles of fabric, either by size or by block, so that it's much easier to grab what you need as you go along! 

Choosing a Pattern
There are a million and one different places to head to for quilt patterns - Pinterest (see my boards here), blogs, books, magazines - and it's great to keep looking & keeping all your ideas in one place.

As much as I love technology, I tend to print out things I like & keep them all together in a folder so that I can reference easily when I'm sewing.

Don't just look for patterns that appear SIMPLE, as even quilts that look difficult may not be. Sometimes its down to the placement of blocks rather than the actual cutting and piecing.


 Image from Fig Tree & Co

Most patterns will tell you not only the fabric requirements, but also if you can use any precuts to aid in your pattern. American patterns tend to be written I yards as opposed to metres and centimetres that we now use in Europe. You don't have to rigidly stick to the number of difference fabrics that a pattern specifies - be creative and go with what works for you. As long as the totals are the same there's no issue!

I love scouring blogs, Pinterest and Instagram for inspiration and patterns & keep them all in a folder on my Dropbox account so that they're always result accessible.

I have quite a few patterns from Thimble Blossoms and Fig Tree & Co which I absolutely love, so check them out.

Our next post will be on sewing your pieces accurately & the most common shapes you might comes across in your quilting adventures..! 

Quilting Bee : September : Block 1 Rail Fence

Hello lovelies!

Well I decided that it would be easier to film my posts so apologies for my awful voice in advance, oh and the sniffing!  I have also done a post on cutting fabric (another video, sorry!) which you might want to watch first as I don't cover cutting here.

Our blocks will all be 12.5" when we complete them (making them 12" when sewn together).  I decided to make them smaller as 1. the fabric is easier to handle, 2. you'll likely have more scraps around this size and 3. the Queen Bee can then easily add more blocks if she wants to to make her quilt bigger.  Perfect!


So for this lovely Rail Fence block you will need:

Fabric A: 4.5" x 12.5"
Fabric B: 4.5" x 12.5"
Fabric C: 4.5" x 12.5"

The colours which Sue has chosen are:
Mustard
Teal
Yellow
Grey
Silver

If you want, you can also do two strips of the same fabric sandwiching the different one in the middle.

Sew them together as in the video (this takes you over to YouTube!).

Ha!  Super simple right?

I have put some ideas up on a Pinterest board HERE so that you can see not just ideas for blocks, but also how you can make quilts up using just that one block.

I am making one extra block each month so that I get a mini-quilt of all 8 at the end of our Bee to hang on my wall :)


Monday 18 August 2014

Make a Mini Cross Wall Hanging!

Some of our Quilting Bees are new to quilting & patchwork, so I decided to throw together a lovely mini wall hanging (very simple!) for them to make to allay their fears.


I love making minis - if you want to test a block for a quilt, this is a great way to then use it for sonething pretty for your wall.

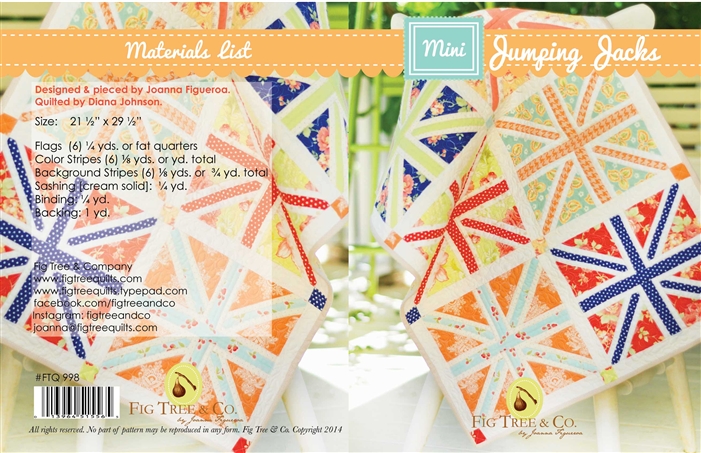
This lovely mini is inspired by a block in Tula Pink's 100 Modern Quilt Blocks (no. 5)

To make this lovely, you will need:

4 or 5 different pieces of fabric
 A - centre cross
 B - squares to make the cross into a square
 C - sashing (around the edge of the square)
 D - binding
 E - backing fabric

Wadding
Thread
Rotary Cutter (or scissors)
Cutting mat
Ruler
Pins
Safety 0r Quilting Pins

Cutting:
From Fabric A cut:
2 x 2.5" squares
1 x 2.5x6.5" rectangle

From Fabric B cut:
4 x 2.5" squares

From Fabric C (or use the same fabric as Fabric B) cut:
2 x 2.5x6.5" rectangles
2 x 2.5x10.5" rectangles

From Fabric D you will need a strip of 2.5 wide fabric that will reach around your square with a little extra (6") to make the binding.  You will probably need to join strips to make the binding long enough to go around.  I am not specifying what will EXACTLY fit as you will need to measure your finished block, but here is what I used for my mini:
2.5"x64"
I don't mind making too much, as I always save what it left over either to make 2.5" squares to to add to a stash for scrappy binding for future projects.

There is some maths* that you can use when estimating binding.
Add together the lengths of your finished mini (here, 10.5"x4).
Add 4" for each corner turn (16")
Add 6" for extra fabric to join the beginning of your binding to the end.
That gives your total length of binding, here 64".

*If you are cutting from a width of fabric (WOF), you can then calculate how many 2.5" strips that you will need to cut by dividing the total length needed by the length of the WOF (work on 42").  You can also do the same for a fat quarter, and divide the total length needed by 20" instead.

To cut your fabric, I recommend using a rotary cutter and ruler on a cutting mat.  The next blog post will cover cutting, so hold out for that one if you're not sure of the best way to cut!

Backing fabric will need to be approximately 14" square.

Finally, you will need some wadding, which should measure around the same as your backing fabric.

Seam Allowances
Generally, seam allowances in quilting are 1/4".  If you don't have a machine that has a specific 1/4" foot DO NOT PANIC!  There's a simple of of making sure that your seams are accurate....

Snip a 2" length of masking or washi tape.
drop your needle down & measure 1/4" from your needle.
Place the tape towards the front of the feed dogs on the machine (the little teeth that pull the fabric through)
This is your 1/4" quide!


How To Make Your Mini
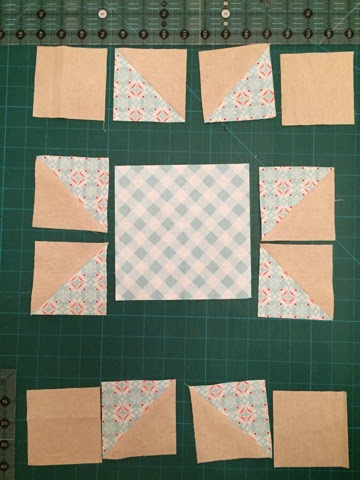
Once your fabric is cut, layout your pieces for the cross & 4 corner squares:


The best way to sew pieces together (if possible) is to work in rows from top to bottom.  So here, firstly sew the middle square on the top row to the top left square.  Right sides of the fabric should be together.


Line the squares up and then the right side of the squares along the edge of your marker.  Sew!
Once you have done this, you need to press.  Sorry!  for the top row, you will press seams to the LEFT.  Lay the fabric as shown below and then move your iron the the left without pulling the fabric


Repeat with the other square on the top row, pressing seams to the LEFT again.


Your top row is not sewn together, so you will need to attach this to the rectangle in the middle of the square.  The best way is to lay out the square as it will look finished, and the lay the top row you just made on top of the rectangle.  Check that it's the right way before you sew!


Once you've done this, you guessed it, you need to press again!  This time, press your seams DOWN, as shown below.


Sew together the squares along the bottom row in the same way as the top row, and again press your seams to the LEFT.  Usually, if you had three rows of the same (i.e. 3 rows of 3 squares) you would press the middle row to the RIGHT so that you can nest your seams.  I purposely picked a pattern where you don't need to worry about nesting seams, but I just wanted to include that info if you're wondering why I'm going on about directions of pressing (boring...!)


 Once you've sewn the bottom row, attach to the top & middle as before.

And press your seams UP!


Check the back of your work to make sure the seams are in the right directions & press again on the reverse to "set your seams".  It should look like this:


Don't rub the iron over the reverse, just hold it down for a few second & move until you've covered the whole square. 


And here's the front!  Quick huh?!


Next, you need to attach your sashing strips that go around the outside your centre square.  Grab your two shorter strips and place them at the top & bottom of the square


Attach these as before, pressing your seams towards the sashing strips (up for the top & down for the bottom)


 Finally, attach the left and right strips in the same way and press towards the sashing strips again.


TADAH!


Now you need to make your mini a mini wall hanging. 


Making a "Quilt Sandwich"
Firstly, you will need to take your backing fabric, which should be a good 2 inches bigger on each side than you front piece.  This is because as you quilt, your fabric will move around.  If you cut them perfectly to size, they probably won't match up at the end and you'll have to cut a lot off to "square" up your finished quilt. Press it well, and stick it PRINT SIDE DOWN (I always do this wrong for some reason!) to a table, making sure there are no wrinkles.  You can use masking tape or washi tape for this.


Next, place your wadding on top & tape down as before.  It doesn't have to make the size perfectly.  You'll be trimming the edges off later...


Finally, place your front piece on top, in the centre and smooth out well, making sure there are no creases in the fabric.


Making sure to go through each of the layer, pin your sandwich together, leaving a hand-width gap between each pin.

To ensure that you do get each layer, I would recommend investing in curved quilter's safety pins.  As they are curved, its much easier to pass them through each layer without moving the fabric around.

As an alternative to pins, you can buy cans of adhesive in your haberdashery.  They aren't cheap & I only use them for small projects!


Once all your pins are in, remove the tape.  You're ready to quilt!!!


I'm not going to tell you how to quilt, because its a pretty personal decision.  As this is a small & quick project you can use it as a tester for different types of quilting.  I decided to "quilt in the ditch" around the cross for mine - this is where you sew along the stitching line, as it hide the stitches that you make.  Its one of my favourites, as it makes a design stand more proud.  It can be tricky keeping it straight & the stitches hidden.


What I would recommend you do is research some quilting options on YouTube.  If you haven't quilted at all before, stick to straight lines, and work from the middle outwards to prevent the fabric bunching up.  You can mark them with some tailors chalk if you have any, and then stitch along the lines.  If you don't have any, then you can use your ruler and a regular "school" ruler and run the latter along the fabric to make a small impression line & sew along that.  You can buy special things called Hera markers (About £3 off Amazon) to do this too.

Generally it is best to quilt using a walking foot as it pulls the fabric through the machine from the top and the bottom, making it easier work for you and the machine.  If you don't have one then that's fine. just

Once you have quilted, you will need to "square up" your quilt.  Using your ruler, place it to the right side of the quilt, with the front piece facing you.  you will find that the edges AREN'T straight.  That's fine & perfectly normal!  It's just the fabric moving as you quilt.


Go around each side, lining your ruler up along the true edge that you have just cut.  Measure as you go to make sure the sides are of a similar length too.  You might have to go back round for a little extra trimming!  If you are using scissors instead of a rotary cutter, mark your lines with a pencil and cut carefully!


Once your mini is squared off, it's time to bind!

People are scared of binding, and to be honest I love it.  That is until I have to join the ends together!

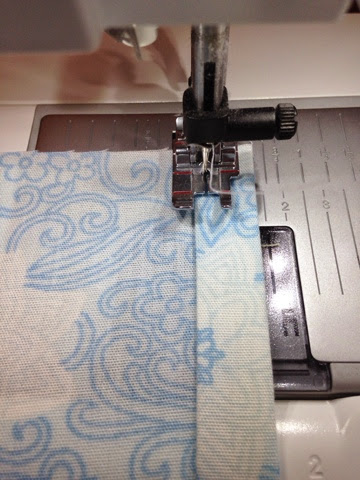
Anyway, to start you need to press your binding strips in half lengthways (I'm assuming here that your strip is in one continuous length,  If you do have to join strips to make it long enough, then it's a little trickier.  I will be doing a separate post on this).  Once you have done this, attach the binding with a pin, with the cut edge of the binding lined up with the edge of your mini.  You will need to leave a tail of about 4" before you start to sew, so place a pin where you are going to start stitching.


I always start my binding in the bottom centre of all my quilts.  You will be stitching again with a 1/4" seam.  Start stitching and stop about 1/4" from the end and cut your threads.


Now you will have to mitre your corner.  To do thishold the just sewn edge away from you and fold the binding UP as shown below...


...it needs to then be folded to match the corner of your quilt, as shown.  Now you need to fold it back down again.  The top fold should line up with the edge of the quilt thats facing away from you and the binding should lie downwards along the next edge of the quilt....


This time, sew from the edge, downwards, until you get to 1/4" from the end & repeat until you are approximately 5" from where you started.  You should now have tails of binding to play with...!


Now the next bit I have really figured out for myself.  My method might not work for you, that's fine.  Have a look on YouTube for other tutorials if its a bit confusing!

Firstly I unfold the tail on the left and fold it upwards as I did for the mitred corners, lining up the fold created at the bottom with the fold of the binding...

I then unfold the tail to the right and lay it over the top of the left one, lining up the top of the right tail with the binding stitched to the left...


Once I have done this, I place pins at the top & bottom of the right strip & through the left one too, making sure that the binding isn't pulled too tightly across or left too loose.

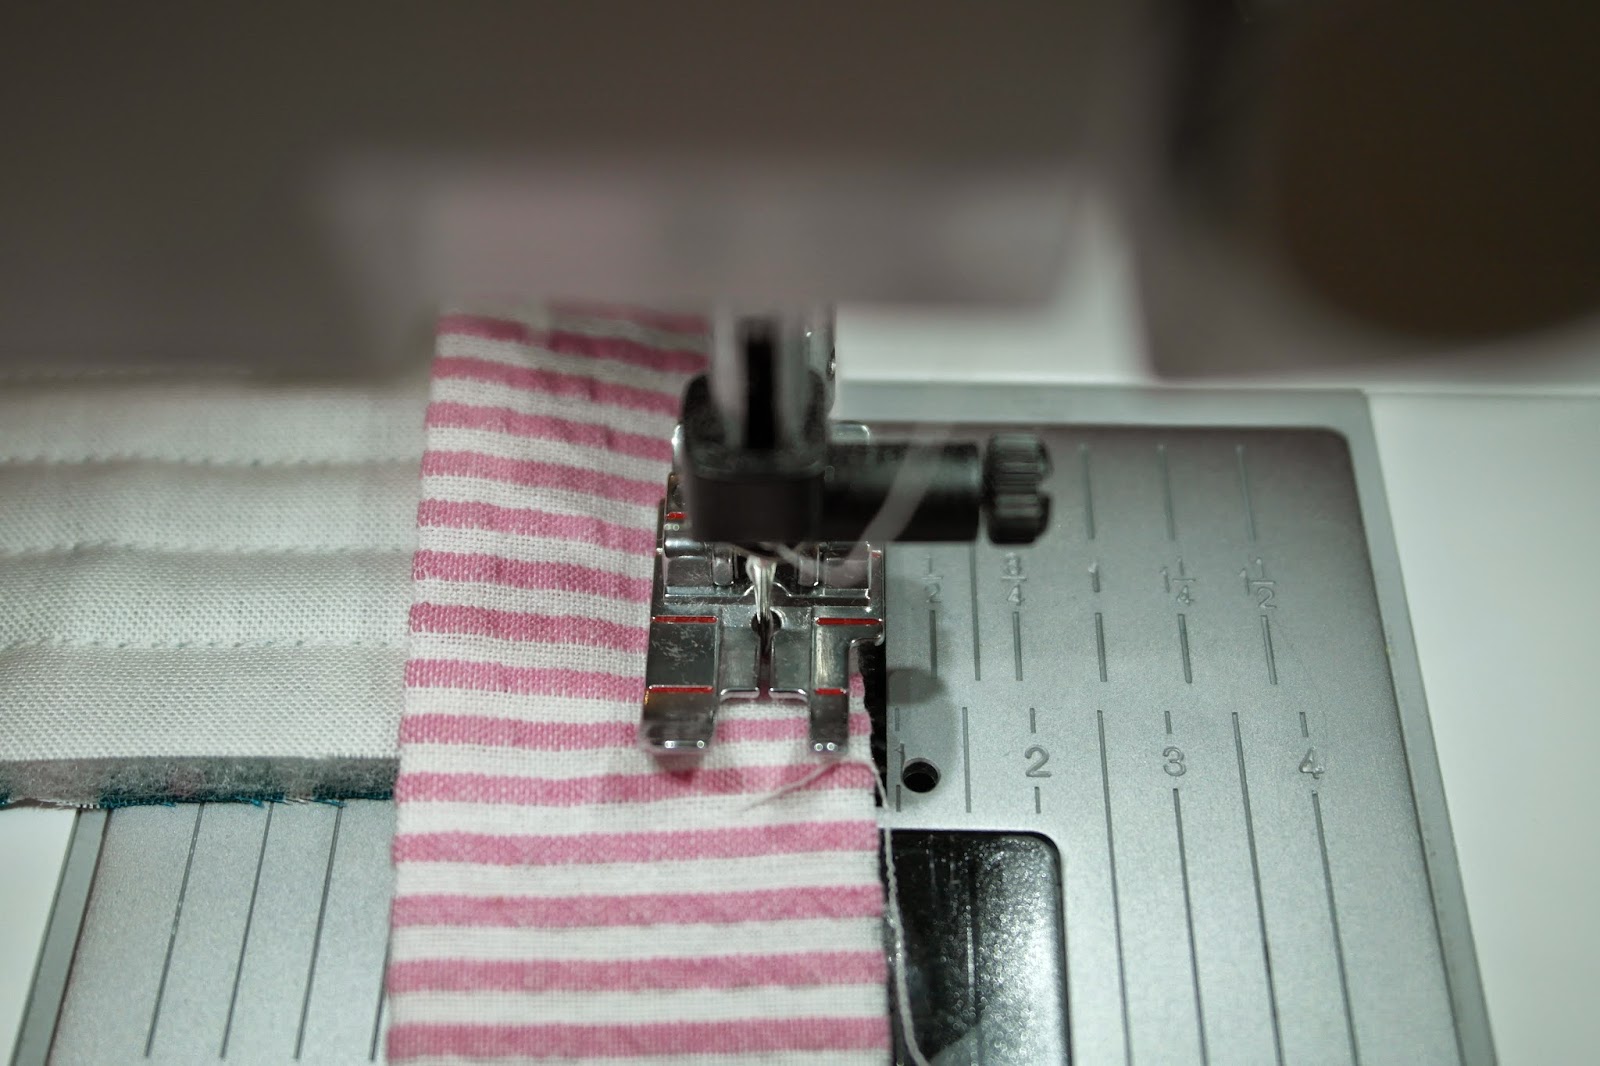
Then I sew diagonally from the top to bottom as shown below:

Once this is sewn, you have a little triangular ear left.  Snip this off about 1/4" from the stitching line & press your seam OPEN.  Then fold the binding back again and press (Your join will leve a diagonal line).  Line this up along the edge of the quilt and stitch closed the gap.

Hurrah! Your binding is on!  

Now all you need to do is turn the binding round to the back of the quilt and stitch it to the reverse.  When you get to the corners, you will need to fold the corner in to create a mitred corner on the back too.  You do this by temporarily folding out the binding on the side to the left of what you are stitching (if you stitch right to left like I do!) and stitch right up to the edge.  Then fold the binding back again to give a finished corner.  If that doesn't make any sense, you go it, YouTube it!  I will be doing a video later this month if you want to wait for that!

As you go around, hand stitch 2 small pieces of hanging ribbon to the top of the quilt, approximately 2" from each edge to hang your quilt from when you are finished.

And that's it!  A lovely little mini.

If you have any queries, if I've messed up or you have any better ideas then PLEASE share!

Happy Quilting!

xxx